This Easy Danish Pastry Dough is something that I have had up my culinary sleeve for the last few years. It is in part courtesy of Nigella and How to Be a Domestic Goddess and it is outstanding, both in it's deliciousness and in it's ability to effectively cut out the classic toil and bother of traditional danish pastry making. What a blinkin boon.
Jump to:
Danish Pastry Recipe
No bashing, no folding. no sweating. The trick is to use the food processor to chop the butter up into small pebble size about 1cm. Twenty seconds and the job is done. Who knew.
*Scroll down to the bottom of this post for a full printable recipe card.*
Such a wonderful recipe should come with a bottle of Champagne and two tickets to the Bahamas. It is such a game changer for me.
Ingredients
- 250 grams (8.8oz) butter cut into 2" chunks
- 4tbsp warm water
- 120 mls milk - like warm
- 7 grams instant yeast (usually packet)
- 50 grams (1.8oz) caster sugar
- 1 large egg
- 350 grams (12.4oz) strong flour
- 1 tsp salt
- 1 beaten egg for egg wash
- 6tsp of jam or lemon cured etc
Method
- Put 250 grams unsalted butter, 7 grams instant yeast (packet) 50 grams caster sugar, 350 grams strong white bread flour and 1 tsp salt into your food processor.

- Blitz on pulse until the butter pieces are about 1 cm pebbles.
- Empty the floury rubble into a mixing bowl, then add the 60 mls of luke warm water/4 tbsp, 125 mls warm milk and 1 large egg (all beaten together) and give a cursory stir until the flour is no longer visible.
- The covered dough is left overnight in the fridge to go about it's business.
- Come morning or whenever you are ready to start, tip the dough out onto a heavily floured work surface.
- Flour the top of the dough and your rolling pin too.
- Roll it out to a rectangle roughly measuring 35 cm x 25 cm. Keep flouring if the butter breaks through.
- I never stick to a measured rectangle and sometimes I end up with a square. I simply can't seem to steer a rolling pin well enough but it doesn't matter here.
- Fold the bottom of the dough up a ⅓ and then the top down over it just like a business letter.
- Don't worry as long as you keep folding the dough into three then goodness prevails and lovely crisp lamination occurs.
- There are also times when the butter seeps through the pastry and is sticky on the rolling surface and rolling pin. I care not. With a flourish of flour I cover the offending buttery patches and carry on regardless.
- You then turn that letter so the fold is on your left like the spine of a book and then roll out again to the same size.
- I usually fold over and roll five times in all. As mentioned the butter does tend to break through but I keep dusting and rolling regardless.
- The pastry finally gets a little stretch to it. I know then that it's ready.
- After the final fold then cover and pop in the fridge for at least 30 minutes. Roll out to the largest square you can whilst still maintaining a thickness of about 3 mm.
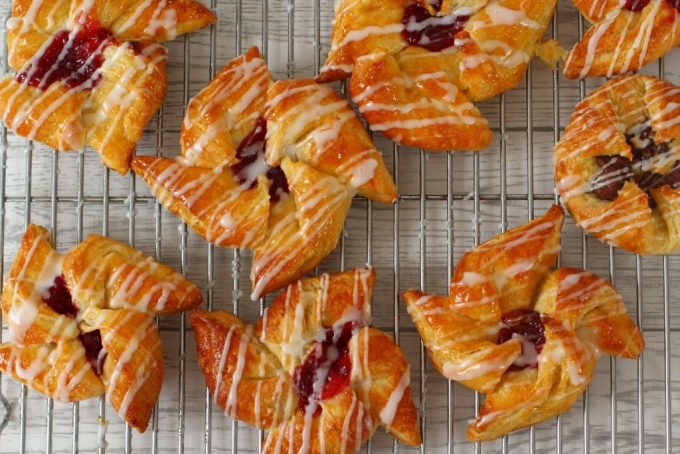
- Over the course of baking these Danish Parcels I have discovered one shape that I favour, the Pinwheel.
- To make the Pin Wheel I cut the dough into roughly ten cm squares with a pizza cutter. I get about 12 and then use the off cuts if I can for a one or two more.I really don't worry about them being too perfect. Once baked and shiny in their gloriousness and icing, whether they are uniform or not is the last thing people are thinking. Or the ones I want sitting at my table anyway!
- You then cut four diagonal lines in the corners of the dough radiating up to the centre.
- You take one corner and bring it to the middle, miss the next one, pin the next one and so on.
- Press the corners down to stick them together and form a little recess for the filling.
- Cover with oiled cling film and allow to almost double in size. This will take up to an hour.
- I brush the shapes with egg wash carefully before putting the fillings in the centres. I usually push the hole for the fillings further down to make sure they don't bubble out of their recess.
- Bake at 180 C for about twelve minutes.
- Place on a wire rack to cool.
- I glaze the Danish Pastries with the Apricot Jam, leave for five mins and then drizzle over the Icing.
I love the Pinwheel because it is pretty and easy to fashion, baking well and usually not breaking free of it's shape. I top with Strawberry Jam, Nutella or Stewed Apples and drizzle with Icing for a final sweet bite.
I know there are other fillings out there but I am looking for easiness here from start to finish. I am looking to dollop alone.
Can you freeze danish pastries?
The fabulous answer is yes! This recipe makes 12/13 pastries so if you wanted half that number then all you need to do is make them into their final shape ready for proving and place them on a baking tray that will fit into your freezer, cover them and freeze for about an hour.
You can then put them all into a plastic bag together and pop them back in for another feast another time. I do recommend using 2 plastic bags (double wrap) to prevent freezer burn.
When you need the frozen dough let it thaw fully and then puff up for the prove as usual.
This dough can also sit in the fridge for at least 24 hours awaiting your attention. I have even left it for longer and it has all been good.
Please remember these do not have to be your local elegant country hotel offering for afternoon tea, these are big homemade beauties worthy of a home awarded Michelin Star.
They taste so incredible step out into the dark side.....
One last advisory word is to keep the fillings sweet and mild. The delicious yeasty dough needs to remain the star here.
IF YOU LIKE THIS RECIPE THEN YOU MAY LIKE THESE
Easy Danish Pastry Dough
Ingredients
- 250 grams unsalted butter cut into 2" chunks
- 60 mls water luke warm/4 tbsp
- 120 mls milk luke warm
- 7 grams instant yeast packet
- 50 grams caster sugar
- 1 large egg
- 350 grams strong white flour
- 1 tsp salt
- 1 egg for eggwash
- 6 tsp Sweet Jams, Lemon Curd, Nutella etc
Icing
- 100 grams icing sugar
- 2 tbsp milk
Glaze
- 2 tbsp apricot jam
- 2 tbsp water
Instructions
- Tip 350 grams flour, 250 grams butter, 1 tsp salt, 7 grams dried yeast and 50 grams sugar into your food processor making sure that the salt and yeast aren't touching.
- Whizz until the butter is roughly 1 cm chunks. It is better to pulse so that you can keep an eye on the size of the lumps. You need the mixture to be quite pebbly.
- Tip the floury rubble out into a mixing bowl. Mix 60 mls luke warm water (4 tbsp), 120 mls warm milk and 1 large beaten egg all together and pour into the mixing bowl. Mix the whole lot together using a wide bladed knife such as a butter knife until all the flour is absorbed. I also sometimes use a wide tined fork.
- Cover with clingfilm and leave in the fridge overnight.
- When you are ready for rolling out of the dough then get out your mixture and tip it out onto a heavily floured surface. Flour the top of the dough and your rolling pin. Roll it out to a rectangle the size of about 35 cm x 25 cm. Keep flouring if the butter breaks through and is soft and tacky. Fold the bottom of the dough up first by a third and then the top down over it exactly like a business letter. The theory is that you then turn the new rectangle so that the fold is to your left like the spine of a book and roll out and repeat another four times. I tend to wing it a bit more than that. My rectangles sometimes become square and so on. The important thing is to get the folds in.
- If butter pops through then flour the spots well and carry on. When the last fold is complete cover and place the folded dough in the fridge for at least 30 mins or more.
- When you are ready to cut out the shapes I roll out the dough into a big square as much as possible. The dough should be about ¼ cm thick. Cut off the raggedy edges with a pizza cutter and cut out about 10 cm squares. As many as you can get. I make Pin Wheels by cutting diagonal lines from each corner of the square towards the centre. I then fold alternate points in and press them firmly into the middle to form the pin wheel star shape. See pics above. Cover and leave somewhere warm to puff up and almost double in size.
- Pre heat the oven to 180 C/350 F/Gas Mark 4. Mix the apricot jam and water together in a bowl.
- Press the centres down gently and spoon your chosen fillings into the recesses. About ½ tsp of filling. Brush gently with egg wash.
- Bake for about 10/12 minutes. Try not to let them get too much colour on. A pale golden colour is what you are aiming for. Place carefully on a wire rack to cool. Brush the apricot jam over the warm pastries for added sticky shine. It does add another dimension to them.
- Mix the Icing sugar and milk vigorously together before trailing fronds of beautiful icing over the top whilst still on the tray. I use a tiny whisk to trail the icing. I find it works perfectly.
- Apply to Smug as Hell Face.
Video
Notes
Nutrition
All nutritional information is approximate and intended only as a guide.
Jenny Paulin says
mmmmm these look so delicious and so pretty . I must give this recipe for the pastry a try because I followed a Paul Hollywood one and it was quite laborious! thank you for sharing with the linky x x
applytofaceblog says
Pleasure Jenny. They genuinely are without faff. I have the attention span of a very stupid goldfish these days so I could only do these if they weren't’ complicated ??
Rebecca Beesley says
wow what a brilliant secret for making it an easier process to make danish pastry! they look brilliant - well done. #gbbobloggers2018 #bakeoftheweek2018
applytofaceblog says
Thanks. I have made them quite a lot and it works every time. Who knew?!!
Anca says
Sounds very easy to make, I will have to try this recipe. Your danish pastries look amazing, very inviting.
applytofaceblog says
Let me know how you get on. They really are very simple.
Louise Fairweather says
These look amazing. I did think of doing pinwheels myself but couldn't decide if jam should be on the top or underneath. I like your reasoning.
applytofaceblog says
Thanks,I have tried both ways and that seems to work best. I’m a bit ham fisted at the best of times ??
Jacqui Bellefontaine | Recipes Made Easy says
Ohh they do look good
applytofaceblog says
Thanks Jacqui! They really are super simple!
Jo Allison / Jo's Kitchen Larder says
These look so professional Jenny and absolutely delicious! I do love the pinwheel shape too with countless options for the centre filling! I love the idea of having these or indeed something cinnamony for festive breakfast and the only way to secure that is to do couple of practice runs with this fab recipe! 🙂 Thank you for sharing with #BakingCrumbs 🙂 x
applytofaceblog says
Pleasure Jo!I can’t recommend the cinnamon Danish enough. They are INCREDIBLE!!!!Enjoy!
Choclette says
Wow, these are beautiful to look at and so appealing. I adore Danish pastries, but always felt rather daunted at the thought of making them. Maybe I will try now you've highlighted this easier method. I have Nigella's book after all! Pinned for later. #CookBlogShare
applytofaceblog says
Please have a go. I am as ham fisted as it gets and have always turned out so well!! A bit of apricot jam and I feel like Mary Berry!
Angela / Only Crumbs Remain says
Oooo my words Jenny, that golden sheen is simply amazing - I bet I could alost see my face in them if I had one infront of me right now! Tell me that you're bringing me one ... pretty please 😉 Seriously, absolutely amazing bake i definitely need to give them a try. Thankyou too for continuing to link up with #BakingCrumbs,
Angela x
applytofaceblog says
Pleasure Angela! I would love to share a sticky bun with you!Hope all is going fabulously and you are having a ball at your potters wheel!xx
Lathiya says
This looks easy and delicious..kids will go gaga over it
Cat | Curly's Cooking says
These look absolutely amazing. They're so invitingly golden brown and that drizzle looks so tasty! I'm glad I'm not the only one that struggles rolling out pastry!
applytofaceblog says
Thanks Cat. I really can’t keep track of any of it ??The more I have made them the more I have realised that it’s the folds that matter.xx
Carole Guy says
Brilliant recipe and method! Would the shaped pastries be ok to freeze before baking?
applytofaceblog says
Yes they freeze very well. It does detail how to do so just before the main recipe. Let me know if you need any more help. They really are worth the effort!
Carole Guy says
Just eaten one of these pinwheels. Honestly the BEST I have ever had (and I have had a lot!) The texture and taste remind me of the konditerei pastries in Munich and Basel. Brilliant recipe. Thank you
Ps Your flapjack was a huge hit too!
applytofaceblog says
Wow!! They are fabulous aren't they. Thank you so much for your feedback. I can't tell you how wonderful it is to know my recipes are successful for other people! Thank you, thank you.
Rugaya says
WOW!! This recipe is the best! Now I enjoy homemade Danishes. Thank you for this amazing recipe.
applytofaceblog says
Fabulous news!! It’s a brilliant recipe isn’t it. Incredibly delicious and such a shortcut! Thank you so much for letting me know!